Make a Tank Blouse and Shorts Set

How to Make a Tank Blouse and Shorts Set
As promised, here is a tutorial for a slightly more difficult summer clothing sewing project. I showed you how to sew a Simple Knit Tank Dress in my last blog post, and now I'm moving on to this adorable tank blouse and shorts set.
My daughter looks so sweet in this outfit that you might be fooled into thinking she is a sweet little two year old. But, lord knows that most of the time she is anything but sweet. Well, she is sweet in one way that never gets old for this DIY momma's heart; she loves anything that "momma made." She has even started exclaiming that "momma made" anything she finds beautiful or delightful, like flowers, kitties, chocolate. Yes Ruby, I am GOD. Just keep believing that and you and I are gonna be just fine.
Supplies:
- fabric of choice in cotton or cotton blend
- knit cotton or cotton blend fabric
- 1 inch elastic band
- 3 buttons

For the Shorts:
1. Use a pair of shorts that fit your child to make a pattern from. Fold the shorts and trace them. Add 1 1/2 inch to the top for the elastic band and 3/4 inch at the bottom for the hem.

2. Cut out 4 pieces from the cotton or cotton blend fabric and pin them together face to face so you have the front and back of the shorts. Pin along the front and back seam and sew together using a straight stitch, then a zig-zag stitch along the edge to prevent fraying.

3. Open each panel and sew a 1/4 inch hem on the top of each side of the shorts using a zig-zag stitch along the edge of the hem. Now fold and iron the bottoms of the shorts. Fold twice and iron then sew using a straight stitch.

5. Pin the front and back panels together face to face and sew along the edges and the crotch of the shorts using a straight stitch and then a zig-zag stitch on the edges to prevent fraying.

6. Fold the top of the shorts down 1 1/4 inch and sew using a straight stitch. Leave about a 1 1/2 inch opening where you will thread the elastic through.

7. Attach a safety pin to the end of the elastic and thread through the opening in the hem. Thread all the way through the hem and then sew the ends together. Sew up the opening in the hem.


For the Blouse:
1. Use a tank top that fits your child to trace a pattern from. Add at least 1/2 inch seam allowance on all sides. Because I used a stretchy knit top to trace my pattern from, I added an inch on all sides for seam allowance.
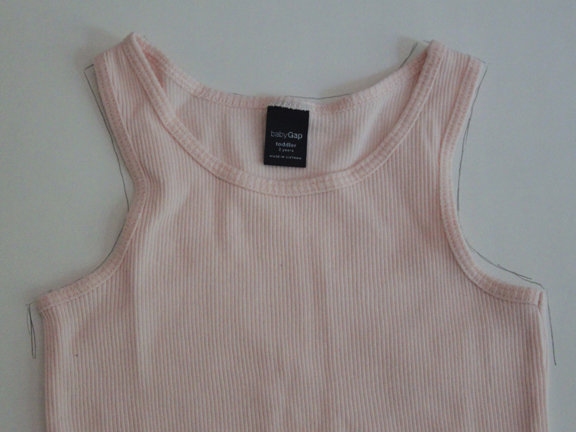
2. Use the tracing you made from your child's tank top to create a template for the back of the blouse. Fold the drawing in half and trace onto another piece of paper. Add a 1 1/2 inch rectangle to the side.

3. Cut all three pieces from the cotton or cotton blend fabric. Make sure to scoop the neck on the front panel slightly. Fold the neck and arm seams 1/4 inch twice, iron and pin. Sew the hems using a straight stitch.

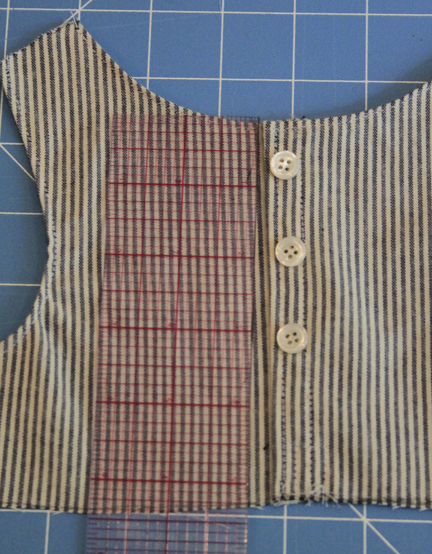
4. Fold the edges of the back panels in 1/4 inch then again 1/2 inch. Iron and pin. Sew them down using a straight stitch.

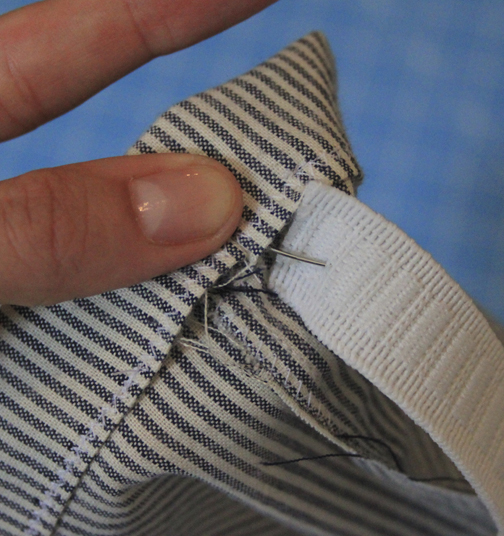
5. Now the two panels should overlap one another. Line them up with the front panel to make sure they overlap correctly. Now pin one panel on top of the other and sew a square at the bottom of the two panels.


6. Measure the button holes and mark them. Use the buttonhole setting on your sewing machine to make the button holes and then sew the buttons onto the inside panel.
7. Measure two rectangles from the cotton or cotton blend knit fabric. For the length, I doubled the measurement of the top of the blouse (for example: the top of the blouse measured 11 inches across so I made each rectangle 22 inches long). Then I measured my child from just below the chest to a couple of inches below her belly button for the length and added 1 1/2 inches for seam and hem allowance, 9 inches.
8. Fold the fabric 3/4 inches, iron and pin. Then sew with an interlocking stitch at the edge of the hem. This works best to prevent stretching the knit fabric.
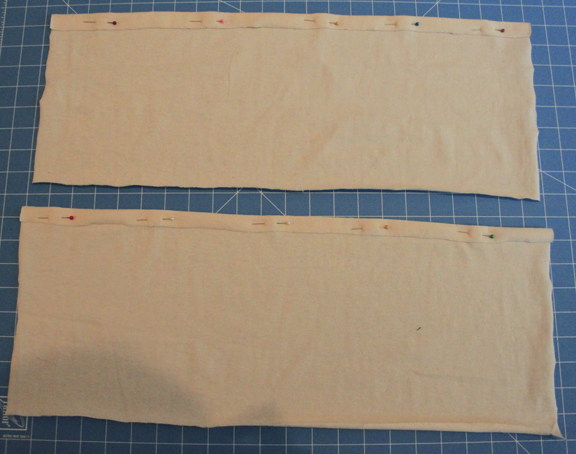

9. Set your machine to straight stitch then set the stitch length to the longest length. Sew a straight stitch along the top of the each panel about 1/4 inch from the top. Do not forward and backward stitch at the beginning and end. Pull on one string on each edge and scrunch the fabric toward the middle. Scrunch the fabric until it is the same length as the top panel of the blouse.

10. PIn the bottom panel to the top panel face to face. Sew them together using a straight stitch. *Don't forget to set the machine stitch length back to normal before you begin stitching. Remove the basting stitch you made earlier then sew the edges using a zig-zag stitch to prevent fraying.

10. Pin the the front and back panel together at the shoulder seams and side seams. Sew together using a straight stitch and then a zig-zag stitch on the edges.
